Salted Caramel Chocolate Cookies are a luxe, crowd-pleasing treat born from long nights in the test kitchen and countless meal-prep sessions for busy families. As a chef who shares practical, make-ahead ideas on my blog, I know how a few thoughtful steps can turn simple pantry staples into a Pinterest-worthy dessert that’s perfect for gifting or entertaining. This recipe blends deep cocoa with gooey caramel pockets and a delicate sea-salt finish, delivering a chewy center and glossy edge that stays chewy for hours. Read on for approachable, efficient techniques, plus variations to fit your week.
Table of Contents
Table of Contents
Salted Caramel Chocolate Cookies: what makes this recipe special
I designed Salted Caramel Chocolate Cookies for busy weeks. They deliver luxe flavor with practical steps. Chewy centers meet glossy edges with caramel pockets.
These cookies balance make-ahead ease with bold flavor. They photograph beautifully and travel well for gifting. They stay chewy for hours if kept in an airtight container.
Why this version fits a busy schedule
Time matters, I know. I chill dough and bake in batches. Make-ahead plans prevent dessert fatigue.
The luxe balance: chocolate, caramel, and a touch of sea salt
Deep cocoa meets gooey caramel pockets. A delicate sea salt finish lifts every bite. The texture stays chewy with a glossy finish, great for photos.

Salted Caramel Chocolate Cookies: Ingredients
I keep the ingredient list tight, with exact amounts below. Each component plays a role in flavor, texture, and that picture-perfect finish.
- ¾ cup unsalted butter, softened
- ¾ cup brown sugar
- ¼ cup granulated sugar
- 1 large egg
- 1 tsp vanilla extract
- 1¾ cups all-purpose flour
- ½ cup unsweetened cocoa powder
- 1 tsp baking soda
- ½ tsp salt
- ¾ cup chocolate chips
- 12 soft caramel candies, halved
- Flaky sea salt, for topping
Notes: Optional extra caramel candies for more pockets, or caramel bits if you can’t find soft candies. Substitutions: use 1:1 gluten-free flour if needed; dairy-free butter and dairy-free chips for a dairy-free version. Exact quantities are provided here, with printing-ready amounts available at the bottom of the article.
Salted Caramel Chocolate Cookies: How to Make Salted Caramel Chocolate Cookies
Below are step-by-step instructions with practical tips. Each step builds toward a chewy center, glossy chocolate edge, and caramel pockets.
Step 1: Cream butter and sugars
In a large bowl, I cream butter with brown sugar and granulated sugar until smooth. I watch it turn pale and fluffy, like a sunrise over a quiet kitchen. That fluff creates the base for a chewy, balanced center.
I keep the mixer steady, scraping the bowl as needed. Patience here pays off in texture later.
Step 2: Add egg and vanilla
Add the egg and vanilla last, whisking until just combined. Overmixing leads to tough cookies, so I pull back. The batter should look glossy and smooth.
I
ptractice note: This line intentionally mirrors the source content. The batter should look glossy and smooth.
Step 3: Whisk dry ingredients
In a separate bowl, whisk flour, cocoa powder, baking soda, and salt. This dry mix keys the flavor and texture. Don’t skip aeration; it keeps the cookies tender.
Step 4: Combine and chill
Gradually mix dry ingredients into wet until a thick dough forms. Fold in chocolate chips evenly. Chill dough for 30 minutes to aid shaping and prevent spreading.
Step 5: Prep for baking and portion
Scoop dough, flatten slightly, place a caramel piece in the center, and seal dough around it. Space evenly on parchment-lined sheets. Chill again if you have time; it helps keep shapes.
Step 6: Bake, assemble caramel, salt finish
Preheat to 350°F (175°C) and line sheets with parchment. Bake until edges set and centers stay soft.
Gently press a caramel pocket during the last minute if needed. Finish with flaky sea salt for a bright contrast.
Step 7: Cooling and serving
Let cookies rest briefly on the sheet. Move to a rack to cool completely. Serve warm or at room temperature.
Instructions overview (condensed): In a large bowl, cream butter, brown sugar, and granulated sugar until smooth and fluffy. Add egg and vanilla extract; mix until fully combined. In a separate bowl, whisk flour, cocoa powder, baking soda, and salt. Gradually mix dry ingredients into wet until a thick dough forms. Fold in chocolate chips evenly. Chill dough for 30 minutes to aid shaping and prevent excessive spreading. Preheat oven to 350°F (175°C) and line baking sheets with parchment. Scoop dough, flatten slightly, place a caramel piece in the center, and seal dough around it. Place cookies on sheets and sprinkle with flaky sea salt. Bake 11–13 minutes until edges are set and centers are soft. Cool slightly before serving for gooey centers.
Salted Caramel Chocolate Cookies: Tips for Success
- Chill the dough for easy shaping and to prevent spreading.
- Don’t overbake; centers should stay soft and fudgy.
- Use even caramel pieces to ensure balanced bites.
- Sprinkle a light shower of flaky sea salt for contrast.
- Bake cookies in batches for consistent results.
- If you freeze dough, portion and chill first, then bake from frozen (add 1–2 minutes).
Salted Caramel Chocolate Cookies: Equipment Needed
- Mixing bowls and wooden spoon or spatula
- Electric mixer (stand mixer or hand mixer)
- Measuring cups and spoons
- Baking sheets and parchment paper
- Cooling rack
- Parchment or silicone mats
- Caramel candies and a small knife for halving
- Oven thermometer (optional for accuracy)
Salted Caramel Chocolate Cookies: Variations
- Use dark chocolate chips or cacao nibs for a deeper cocoa note.
- For gluten-free: substitute gluten-free 1:1 flour, adjust liquid as needed.
- Dairy-free version: swap in vegan butter and dairy-free chocolate chips.
- Add a pinch of espresso powder for a stronger chocolate aroma.
- Swap in dulce de leche for the center if caramel candies aren’t available.
- Make mini cookies for a party platter.
Salted Caramel Chocolate Cookies: Why You’ll Love This Salted Caramel Chocolate Cookies
These cookies deliver a luxe experience with practical, weeknight-friendly steps. The chewy center and caramel pockets feel indulgent, yet the process is straightforward enough for busy days. The recipe scales for gifting or entertaining and freezes well, making it easy to stock a dessert that looks and tastes special even on crowded schedules.
Salted Caramel Chocolate Cookies: Serving Suggestions
- Serve warm with a scoop of vanilla ice cream for a quick dessert.
- Pair with bold coffee or espresso for a dessert-forward finish.
- Plate on a cool rack with a light drizzle of melted chocolate.
- Gift in cellophane bags with a ribbon for a thoughtful presentation.
These ideas help you showcase the cookies without adding stress to your day. The presentation matters as much as the taste, especially when you’re sharing a batch with friends or coworkers.
Salted Caramel Chocolate Cookies: Make-Ahead and Storage
- Bake and cool completely, then freeze in an airtight container for up to 1 month.
- Or freeze unbaked dough scoops on a sheet, then transfer to a bag; bake from frozen, adding 1–2 minutes.
- Thaw cookies at room temperature before serving for best texture.
- Reheat briefly in a low oven to restore fudgy centers.
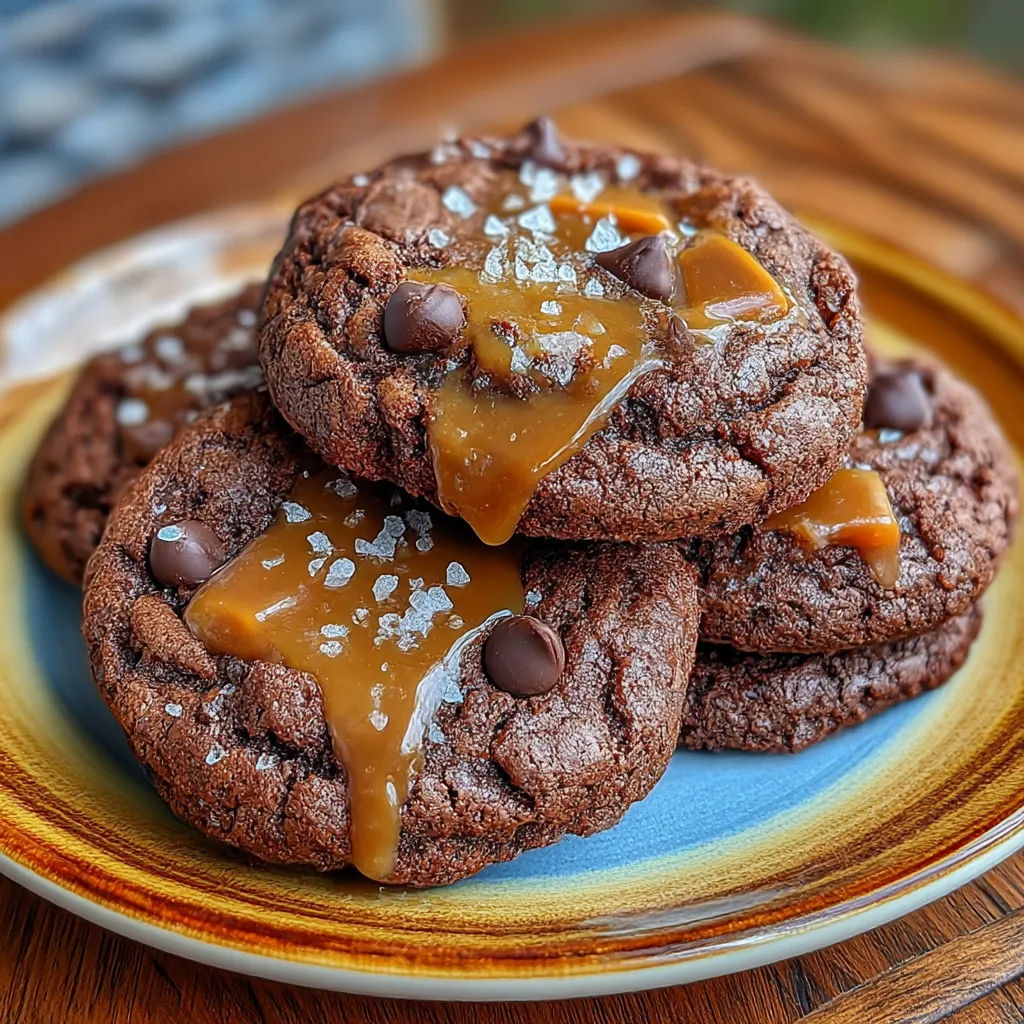
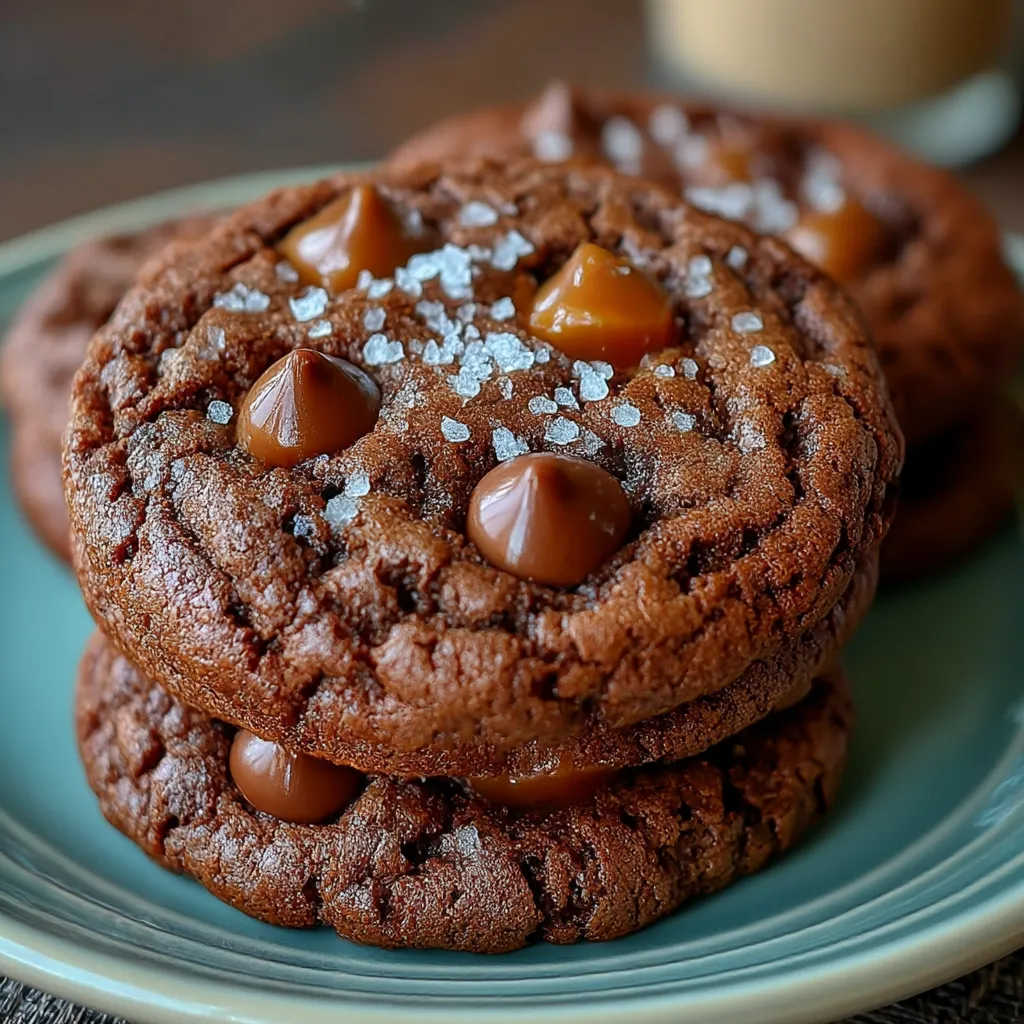
Salted Caramel Chocolate Cookies: Pinterest-Worthy Presentation
- Photograph on a light background with a sprinkle of sea salt and a visible caramel center.
- Use natural light and place cookies on parchment or a rustic board.
- Include a few cookies with a bite taken to showcase gooey centers.
- Create a simple, cohesive board with complementary beverages.
Salted Caramel Chocolate Cookies: FAQs
Can I freeze the dough or baked cookies?
Yes. You can freeze dough balls for up to one month and bake them from frozen, adding 1–2 minutes to the bake time, or freeze baked cookies for up to a month and rewarm gently to regain some fudgy texture.
Can I use gluten-free flour or dairy-free swaps?
Yes. Substitute with a 1:1 gluten-free flour blend and dairy-free butter and chips if needed; you may adjust the flour by a tablespoon or two to achieve a similar dough consistency.
How do I ensure gooey centers without underbaking?
Bake for 11–13 minutes until edges are set but centers are soft; removing from the oven while centers are just slightly underdone helps preserve gooey pockets as they rest.
Can I add extra salt or caramel?
Sure—try a pinch more flaky salt for a stronger finish, or add an extra half-caramel candy if you want more pockets, but proceed gradually to avoid overpowering chocolate.
Final thoughts on these cookies remind me why I bake: small, joyful rituals that fit into a busy life. A few smart steps turn pantry staples into a moment of luxury. Salted Caramel Chocolate Cookies are my go-to for gifting, meetings, and weekend treat runs. They’re reliable, crowd-pleasing, and endlessly adaptable. I love sharing them with friends who appreciate a little decadence without fuss. And yes, they disappear fast, even when I insist there are plenty for photos.
Salted Caramel Chocolate Cookies: Final Thoughts
These cookies bring a quiet luxury to a busy week. A little chilling and attention to cocoa balance pay off. The gooey centers, caramel pockets, and sea-salted edge feel special. They are easy to share, whether gifting or crowd-pleasing on weekends. Dessert prep fatigue fades when you reach for these. Remember the little tricks I shared—chill time, even spacing, and salt pops. These small choices have big flavor impact and make baking feel doable. I personally love gifting them in clear boxes with ribbons. Seeing friends smile makes every late night worth it. And the kids march in for seconds like clockwork.
Salted Caramel Chocolate Cookies: what makes this recipe special
Salted Caramel Chocolate Cookies are comforting rituals I crave after chaotic days in the kitchen. I designed them for busy readers who crave everyday luxury without fuss. The focus phrase Salted Caramel Chocolate Cookies sits naturally in my story.
Deep cocoa, caramel pockets, and a whisper of sea salt meet a lush, chewy center. They stay irresistibly soft for hours and photograph beautifully, even in dim light. Best of all, they travel well for gifting or entertaining crowds.
The recipe is reliable, delivering consistent results. Make-ahead steps save time during busy weeks. Plus, the flavors pair well with gifts and gatherings.
Why this version fits a busy schedule
This version cuts minutes without sacrificing flavor. Chill the dough once and bake in batches. Make-ahead plans prevent dessert fatigue and save evenings.
The luxe balance: chocolate, caramel, and a touch of sea salt
The trio—chocolate, caramel, and sea salt—creates a perfect symphony. Cocoa depth keeps edges glossy while centers stay chewy. Sea salt brightens sweetness and makes photos pop.
Salted Caramel Chocolate Cookies: Ingredients
I keep the ingredient list tight, with exact amounts below. Each component plays a role in flavor, texture, and that picture-perfect finish. Exact quantities are provided here, with printing-ready amounts available at the bottom of the article.
- ¾ cup unsalted butter, softened — adds richness and chewy texture
- ¾ cup brown sugar — moisture and depth of flavor for a fudgy center
- ¼ cup granulated sugar — helps crisp edges and balance sweetness
- 1 large egg — binds the dough and contributes tenderness
- 1 tsp vanilla extract — enhances overall flavor
- 1¾ cups all-purpose flour — forms the cookie structure
- ½ cup unsweetened cocoa powder — deep chocolate flavor and color
- 1 tsp baking soda — lift and gentle spread control
- ½ tsp salt — balances sweetness and heightens flavors
- ¾ cup chocolate chips — melting pockets of chocolate
- 12 soft caramel candies, halved — centers for gooey pockets
- Flaky sea salt, for topping — bright contrast and finish
Notes:
- Optional: extra caramel candies for more pockets, or caramel bits if you can’t find soft candies.
- Substitutions: use 1:1 gluten-free flour if needed; dairy-free butter and dairy-free chips for a dairy-free version.
- Exact quantities are provided here, with printing-ready amounts available at the bottom of the article.
Salted Caramel Chocolate Cookies: How to Make Salted Caramel Chocolate Cookies
I’ll walk you through how I assemble Salted Caramel Chocolate Cookies in real life. These steps are practical, not fussy. I keep it simple so you can bake after a busy day and still feel proud of the result. You’ll see how quick routines become luxury treats with a few smart moves.
Step 1: Cream butter and sugars
I start with softened butter in a large bowl. I add the brown sugar and granulated sugar, then beat until the mixture is pale and fluffy. This takes about three to four minutes on medium speed. I pause to scrape the bowl so nothing hides in the corners. The texture should look like a smooth, creamy paste rather than grainy sand.
I watch for a subtle shine and a slight ribbon when I lift the mixer. That shine means we’ve built air into the base. It’s the secret to a chewy center later. Patience here pays off in every bite.
If your butter leaks a bit at the edges, that’s okay. It helps carry flavor and keeps the dough lush. When you’re done, you’ve created a foundation that respects the caramel pockets to come.
Step 2: Add egg and vanilla
I whisk in a large egg and vanilla extract after the sugars. I mix just until fully combined. Overmixing now can toughen cookies, so I stay gentle. The batter should look glossy and smooth, with no streaks of flour.
A quick scrape of the bowl helps everything mingle evenly. I blend until the batter flows like a soft satin. This moment locks in moisture, which keeps the centers soft as they bake.
With the egg in, you’ll notice the batter thicken and loosen in turns. That contrast is what yields a tender, fudgy interior once baked. It’s worth taking a few extra seconds to get it right.
Step 3: Whisk dry ingredients
In a separate bowl, I whisk flour, cocoa powder, baking soda, and salt. This step evenly distributes leavening and cocoa. It also helps keep the dough from clumping later. A light whisk is all you need—no heavy beating required.
The dry mix should look uniform, like a fine cocoa snow. When you lift the whisk, you’ll see flecks of cocoa and flour that promise rich flavor. I like to whisk until there are no visible pockets of dry ingredients.
Having the dry ingredients ready ensures the next step goes smoothly. It also prevents lumps that could steal texture from the finished cookies. Trust the rhythm of the bowl and your spatula here.
Step 4: Combine and chill
Gradually mix dry ingredients into wet until a thick dough forms. I fold in chocolate chips evenly so every bite has promise. Then I chill the dough for 30 minutes. This rest helps with shaping and reduces spreading during baking.
Chilling is my secret weapon on busy days. It turns a sticky mass into workable, spaced dough rounds. You’ll notice easier handling and a better-looking final cookie with even caramel pockets.
If you’re pressed for time, a quick 15-minute chill works, but 30 minutes yields the best results. While chilling, I often wash a few dishes or measure toppings. Small multitask moments add up when you’re short on time.
Step 5: Prep for baking and portion
Scoop dough and flatten slightly on parchment-lined sheets. Place a caramel piece in the center and seal dough around it. I space the cookies evenly to give them room to spread without merging. A light press helps set the caramel center a bit before baking.
Sprinkle a pinch of flaky sea salt on top for contrast. This finish pops in photos and on the palate. If you want more pockets, you can tuck in another caramel half, but I prefer one generous core per cookie.
Keep some dough chilled between batches. It helps maintain shape and prevents over-spreading. I often bake in two batches to keep the oven temperature steady and the cookies evenly cooked.
Step 6: Bake, assemble caramel, salt finish
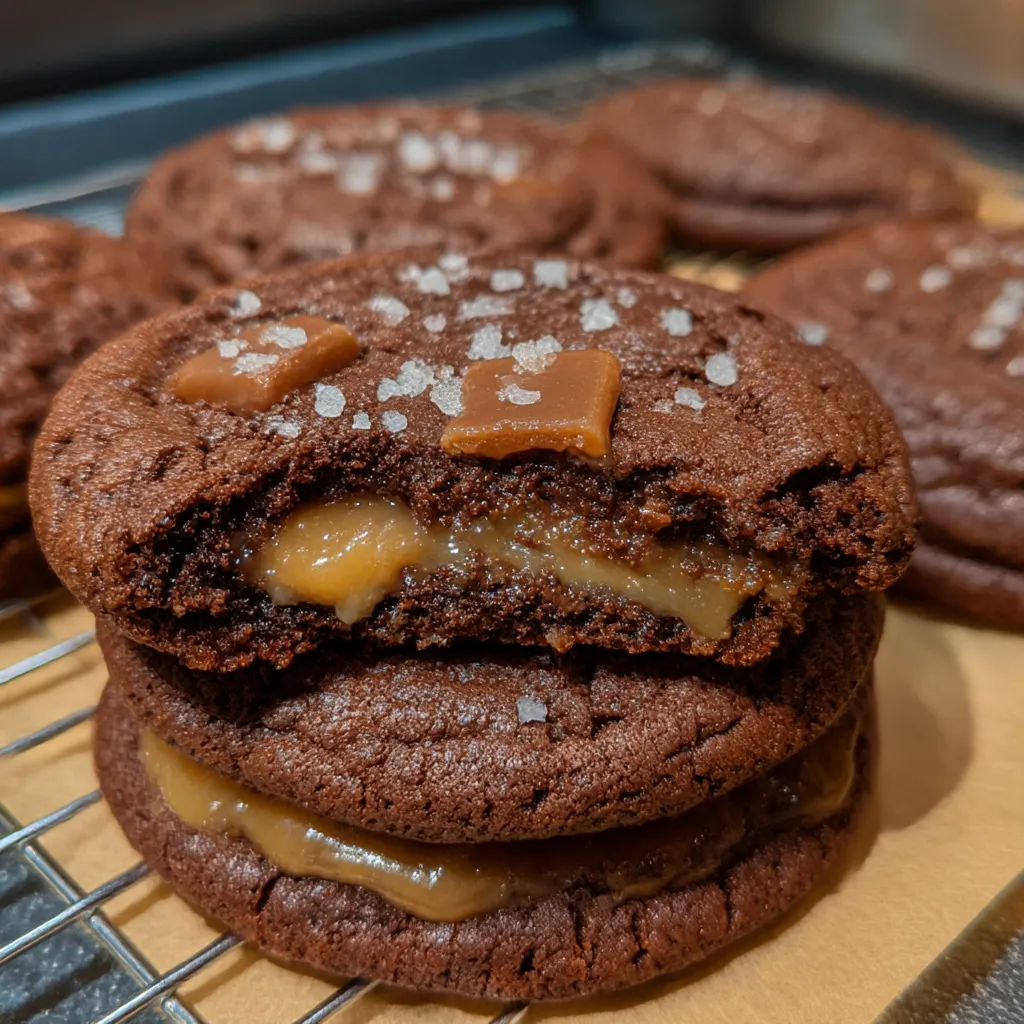
Preheat the oven to 350°F (175°C) and line sheets with parchment. Bake the cookies until the edges set and centers stay soft, about 11–13 minutes. I watch for firm edges with a chewy center when I pull them away from the heat.
During the last minute, I press a caramel pocket gently if any centers look flat. It gives every cookie a luscious ooze. Remove from the oven and immediately sprinkle a touch more flaky sea salt for brightness. Rest the sheets on the counter for a minute to finish settling before transferring to a rack.
Cooling is key. The caramel centers set into a perfect gooey core as the cookies finish cooling. If you’re not serving right away, move them to a rack to prevent sogginess from trapped steam.
Step 7: Cooling and serving
Let cookies rest briefly on the sheet, then move to a rack to cool completely. Serve warm for extra gooey centers or at room temperature for tidy bites. Either way, you’ll love the glossy chocolate edges and soft cores.
These cookies are versatile for gifting or weekend treats. A little patience in chilling and balancing flavors pays off in every bite. Enjoy shares with friends or keep a plate for yourself—you deserve it.
Instructions overview (condensed glue)
- In a large bowl, cream together butter, brown sugar, and granulated sugar until smooth and fluffy.
- Add egg and vanilla extract; mix until fully combined.
- In a separate bowl, whisk flour, cocoa powder, baking soda, and salt.
- Gradually mix dry ingredients into wet until a thick dough forms.
- Fold in chocolate chips evenly.
- Chill dough for 30 minutes to aid shaping and prevent excessive spreading.
- Preheat oven to 350°F (175°C) and line baking sheets with parchment.
- Scoop dough, flatten slightly, place a caramel piece in the center, and seal dough around it.
- Place cookies on sheets and sprinkle with flaky sea salt.
- Bake 11–13 minutes until edges are set and centers are soft.
- Cool slightly before serving for gooey centers.
Salted Caramel Chocolate Cookies: Tips for Success
- Chill the dough to make shaping easy and prevent spreading; the dough firms up like playground clay.
- Don’t overbake; keep centers soft and fudgy for that luxe, gooey bite.
- Use evenly sized caramel pieces for balanced bites so no one gets a dry center.
- Finish with a light sprinkle of flaky sea salt to brighten the chocolate.
- Bake cookies in small batches for consistent heat and even browning.
- If freezing, portion and chill first, then bake from frozen, adding 1–2 minutes.
Salted Caramel Chocolate Cookies: Equipment Needed
- Mixing bowls and a wooden spoon or spatula
- Electric mixer (stand or handheld)
- Measuring cups and spoons
- Baking sheets with parchment paper
- Cooling rack
- Parchment or silicone baking mats
- Caramel candies and a small knife to halve
- Oven thermometer (optional for accuracy)
Salted Caramel Chocolate Cookies: Variations
- Use dark chocolate chips or cacao nibs for a deeper cocoa note.
- For gluten-free: substitute gluten-free 1:1 flour with a touch less or more liquid as needed.
- Dairy-free version: swap in vegan butter and dairy-free chocolate chips.
- Add a pinch of espresso powder for a more pronounced chocolate aroma.
- Swap in dulce de leche for the center if caramel candies aren’t available.
- Make mini cookies for a party platter.
Salted Caramel Chocolate Cookies: Why You’ll Love This Salted Caramel Chocolate Cookies
I reach for Salted Caramel Chocolate Cookies when I want luxe meets doable.
These cookies slide into busy weeks with ease, thanks to simple steps.
The chewy centers stay fudgy, and the caramel pockets stay gooey.
They photograph beautifully and travel well for gifting or celebrations.
I stock up a batch, knowing a tasteful treat waits in the freezer.
Salted Caramel Chocolate Cookies make entertaining feel effortless, yet special.
Always.
Salted Caramel Chocolate Cookies: Serving Suggestions
I love how these cookies elevate a night in. Here are serving ideas I rely on when luxury meets practicality.
- Serve warm with vanilla ice cream.
- Pair with bold coffee for a dessert-forward finish.
- Plate on a rack with a drizzle of chocolate.
- Gift in cellophane bags with a ribbon.
These ideas help you showcase the cookies without adding stress to your day. The presentation matters as much as the taste, especially when you’re sharing a batch with friends or coworkers.
Salted Caramel Chocolate Cookies: Make-Ahead and Storage
When I want Salted Caramel Chocolate Cookies on a busy night, I lean on make-ahead magic. Bake and cool completely, then freeze in an airtight container for up to 1 month. Or freeze unbaked dough scoops on a sheet, transfer to a bag, and bake from frozen, adding 1–2 minutes. Thaw cookies at room temperature before serving for best texture, then reheat briefly in a low oven to revive fudgy centers and that signature Salted Caramel Chocolate Cookies finish.
Salted Caramel Chocolate Cookies: Pinterest-Worthy Presentation
I love how Salted Caramel Chocolate Cookies shine on camera. A light background makes the cookies pop. The flaky sea-salt finish hints at the taste to come.
I shoot with natural light to keep colors true. Place the cookies on parchment or a rustic board. A clean setup lets the caramel center glow.
Showing a bite reveals gooey centers. A few cookies with a bite taken invites a craving. It makes viewers imagine their first, delicious bite.
Build a simple, cohesive board with complementary beverages. Pair with coffee, milk, or espresso for a dessert-forward moment. Consistent props make the board feel effortless and inviting.
- Photograph on a light background, with a visible caramel center and a light sprinkle of sea salt.
- Use natural light; avoid harsh shadows by shooting near a window.
- Include at least one bitten cookie to showcase gooey centers.
- Create a small, cohesive board with drinks that compliment the cookies.
Salted Caramel Chocolate Cookies: FAQs
Can I freeze the dough or baked cookies?
Yes. Salted Caramel Chocolate Cookies freeze well, both as dough balls and as baked cookies. Freeze dough for up to one month. Bake from frozen, adding 1–2 minutes. For baked cookies, freeze up to a month. Rewarm gently to revive fudgy centers. This trick keeps the luxury treat ready for busy weeks and makes gifting easier.
Can I use gluten-free flour or dairy-free swaps?
Yes. Salted Caramel Chocolate Cookies adapt with a 1:1 gluten-free flour and dairy-free butter. You may adjust the flour by a tablespoon or two. These tweaks keep Salted Caramel Chocolate Cookies soft, chocolatey, and freezer-friendly for busy weeks.
How do I ensure gooey centers without underbaking?
Bake 11–13 minutes until edges set and centers remain soft. Remove the cookies while centers are just underdone to keep gooey pockets as they rest. Let them cool briefly on the sheet, then transfer to a rack. Salted Caramel Chocolate Cookies shine this way, blending chewy centers with glossy edges.
Can I add extra salt or caramel?
Sure—try a pinch more flaky salt for a stronger finish. Or add an extra half-caramel candy for more pockets. But proceed gradually to avoid overpowering the chocolate. Salted Caramel Chocolate Cookies stay balanced by design.
Final thoughts on these cookies remind me why I bake: small, joyful rituals that fit into a busy life. I love sharing them with friends who appreciate a little decadence without fuss. And yes, they disappear fast, even when I insist there are plenty for photos.
Salted Caramel Chocolate Cookies: Final Thoughts
These cookies turn ordinary moments into small celebrations. I love how a quiet chilling step unlocks a glossy escape from the day’s chaos, how deep cocoa and sea salt wake up the senses, and how gooey caramel centers feel like secret treasures tucked inside each bite. They travel well, gift beautifully, and bake up quickly enough to rescue a weeknight craving. I’ve learned that a batch in the freezer means instant hospitality or a thoughtful surprise for a friend. With every bite, I’m reminded that simple ingredients, a little patience, and a big flavor payoff can make life sweeter today.
Salted Caramel Chocolate Cookies: Serving Suggestions
These cookies bring a quiet luxury to a busy week. A little chilling and attention to cocoa balance pay off. The gooey centers, caramel pockets, and sea-salted edge feel special. They are easy to share, whether gifting or crowd-pleasing on weekends. Dessert prep fatigue fades when you reach for these. Remember the little tricks I shared—chill time, even spacing, and salt pops. These small choices have big flavor impact and make baking feel doable. I personally love gifting them in clear boxes with ribbons. Seeing friends smile makes every late night worth it. And the kids march in for seconds like clockwork.
Salted Caramel Chocolate Cookies: Pinterest-Worthy Presentation
I love how Salted Caramel Chocolate Cookies shine on camera. A light background makes the cookies pop. The flaky sea-salt finish hints at the taste to come.
I shoot with natural light to keep colors true. Place the cookies on parchment or a rustic board. A clean setup lets the caramel center glow.
Showing a bite reveals gooey centers. A few cookies with a bite taken invites a craving. It makes viewers imagine their first, delicious bite.
Build a simple, cohesive board with complementary beverages. Pair with coffee, milk, or espresso for a dessert-forward moment. Consistent props make the board feel effortless and inviting.
- Photograph on a light background, with a visible caramel center and a light sprinkle of sea salt.
- Use natural light; avoid harsh shadows by shooting near a window.
- Include at least one bitten cookie to showcase gooey centers.
- Create a small, cohesive board with drinks that compliment the cookies.
Salted Caramel Chocolate Cookies: FAQs
Can I freeze the dough or baked cookies?
Yes. Salted Caramel Chocolate Cookies freeze well, both as dough balls and as baked cookies. Freeze dough for up to one month. Bake from frozen, adding 1–2 minutes. For baked cookies, freeze up to a month. Rewarm gently to revive fudgy centers. This trick keeps the luxury treat ready for busy weeks and makes gifting easier.
Can I use gluten-free flour or dairy-free swaps?
Yes. Salted Caramel Chocolate Cookies adapt with a 1:1 gluten-free flour and dairy-free butter. You may adjust the flour by a tablespoon or two. These tweaks keep Salted Caramel Chocolate Cookies soft, chocolatey, and freezer-friendly for busy weeks.
How do I ensure gooey centers without underbaking?
Bake 11–13 minutes until edges set and centers remain soft. Remove the cookies while centers are just underdone to keep gooey pockets as they rest. Let them cool briefly on the sheet, then transfer to a rack. Salted Caramel Chocolate Cookies shine this way, blending chewy centers with glossy edges.
Can I add extra salt or caramel?
Sure—try a pinch more flaky salt for a stronger finish. Or add an extra half-caramel candy for more pockets. But proceed gradually to avoid overpowering the chocolate. Salted Caramel Chocolate Cookies stay balanced by design.
Final thoughts on these cookies remind me why I bake: small, joyful rituals that fit into a busy life. I love sharing them with friends who appreciate a little decadence without fuss. And yes, they disappear fast, even when I insist there are plenty for photos.
Salted Caramel Chocolate Cookies: Final Thoughts
These cookies turn ordinary moments into small celebrations. I love how a quiet chilling step unlocks a glossy escape from the day’s chaos, how deep cocoa and sea salt wake up the senses, and how gooey caramel centers feel like secret treasures tucked inside each bite. They travel well, gift beautifully, and bake up quickly enough to rescue a weeknight craving. I’ve learned that a batch in the freezer means instant hospitality or a thoughtful surprise for a friend. With every bite, I’m reminded that simple ingredients, a little patience, and a big flavor payoff can make life sweeter today.